The webcam stopped working. It was probably being plugged into a different USB slot, and the driver was re-installing (why does that happen if you use a different slot?), but the re-install was failing: "The class installer has denied the request to install or upgrade this device."
Anyway, to cut a long story short, and for the benefit of future googlers, the problem must have been that some webcam files had been installed under a different username, and were failing to be overwritten. Having logged in with the correct user, the re-install succeeded, and now it's working for the other user too.
In case you're wondering, both users are administrators, so it wasn't that.
Update: I typed too soon - after unplugging and replugging the webcam it stopped working again.
This time I logged back in as the user it works for, plugged back in, then looked at the list of driver files (via Device Manager). I worked my way through the list, finding each file in Explorer and looking at the properties of each file, and three that were executables had some text on the Properties General tab saying that the file had been copied from another computer and were blocked. For each one I clicked the "Unblock" box and then "Apply", then unplugged the webcam, logged out and in to the other account, plugged the webcam in, and hey-presto, this time it worked.
Crossing-fingers that it lasts this time.
Saturday, 31 January 2009


Thursday, 4 December 2008
Outlook Onebox
One of the things I like most about GMail is the way it groups messages together into conversation threads, including the messages that are from me. Now that I'm using it, I can't believe I've put up with conversations being split across Inbox and Sent for so long in other email tools.
I use Outlook at work (I won't go into why here - that's a rant for another day...) and wondered if I could achieve something similar by setting up rules to copy incoming and outgoing messages into a single folder. I set it up, naming the folder "Onebox", and it worked - with the list of messages grouped by conversation, each thread contained my messages as well as those of others, keeping everything nicely in context.
I'd only been using it for five minutes when I realised I didn't need the new folder and the rules - I could simply make a search folder, including messages from the Inbox or the Sent folder, which has just the same effect, but keeps a separate Inbox and Sent too, just in case there's a use for it.
I've also added an automatic formatting rule for the Onebox search folder, to make my name appear in a light grey text on my messages in conversations, as a more immediate way to see the pattern of to and fro in the list of messages.
So...one Outlook problem down, only five gazillion or so to go...
I use Outlook at work (I won't go into why here - that's a rant for another day...) and wondered if I could achieve something similar by setting up rules to copy incoming and outgoing messages into a single folder. I set it up, naming the folder "Onebox", and it worked - with the list of messages grouped by conversation, each thread contained my messages as well as those of others, keeping everything nicely in context.
I'd only been using it for five minutes when I realised I didn't need the new folder and the rules - I could simply make a search folder, including messages from the Inbox or the Sent folder, which has just the same effect, but keeps a separate Inbox and Sent too, just in case there's a use for it.
I've also added an automatic formatting rule for the Onebox search folder, to make my name appear in a light grey text on my messages in conversations, as a more immediate way to see the pattern of to and fro in the list of messages.
So...one Outlook problem down, only five gazillion or so to go...
My Desk - doors and handles
Oops. Where have the last five months gone? I actually finished the desk before the last blog entry, I'm just a bit behind in telling the story...
The two doors were very easy - they're just rectangles after all, so just the edging strips to apply. The handles were attached in no time at all.
The hinges were a bit more trouble. I bought a cutter specifically for the size of hole required for kitchen door hinges. It's probably supposed to be used in a router, but the shaft was too large for my ultra-cheap router, so I had to use the electric drill instead. It worked, but the cutter got really hot - hot enough to make the MDF smoke and make a terrible stink.
The hinges on the doors in our kitchen are rubbish - they squeak, and click as the doors are shut, and won't stay aligned - and I wanted the desk doors to have more of a quality feel to them, so I purchased some from a quality brand - Blum. Because the doors are inset, unlike most kitchen doors, a special type of hinge is required. Positioning the holes for the hinges was quite tricky to work out - a lot of time was spent studying the fitting diagrams - but I worked it out in the end, and the doors fit perfectly.
As the doors are inset, I needed a stop for each door to close against. I wanted to be able to adjust the position of the stop, because even a small error in the position would show up as a difference in the amount the door is inset from the front of the unit on each side.
After much head-scratching, I eventually decided to fit a small dowel into the end of a piece of larger dowel, slightly offset from the centre. A hole was then drilled to fit the small dowel in the side of each unit, measured as accurately as I could manage. I then attached the door, and closed it, and as expected, the closed position wasn't quite correct. Then came the clever bit - by rotating the larger dowel, with its smaller, offset dowel in the hole, the position of the larger dowel altered very slightly with respect to the front edge of the unit, thereby adjusting the closed position of the door. A bit of glue in the dowel hole and it set in position overnight.
I also bought some soft-close attachments, which I'm really pleased with. The doors can be swung shut against the soft-close mechanism, from where they slowly close themselves, ending with a quiet tap as the door touches the dowel stop. It's like clockwork, except it's pneumatic, or hydraulic, or something. Whatever.
In the picture below you can see the newly-fitted doors, handles, and the rear triangle of the desk top all fitted. Looks finished? Wait 'til you see the final step...

The two doors were very easy - they're just rectangles after all, so just the edging strips to apply. The handles were attached in no time at all.
The hinges were a bit more trouble. I bought a cutter specifically for the size of hole required for kitchen door hinges. It's probably supposed to be used in a router, but the shaft was too large for my ultra-cheap router, so I had to use the electric drill instead. It worked, but the cutter got really hot - hot enough to make the MDF smoke and make a terrible stink.
The hinges on the doors in our kitchen are rubbish - they squeak, and click as the doors are shut, and won't stay aligned - and I wanted the desk doors to have more of a quality feel to them, so I purchased some from a quality brand - Blum. Because the doors are inset, unlike most kitchen doors, a special type of hinge is required. Positioning the holes for the hinges was quite tricky to work out - a lot of time was spent studying the fitting diagrams - but I worked it out in the end, and the doors fit perfectly.
As the doors are inset, I needed a stop for each door to close against. I wanted to be able to adjust the position of the stop, because even a small error in the position would show up as a difference in the amount the door is inset from the front of the unit on each side.
After much head-scratching, I eventually decided to fit a small dowel into the end of a piece of larger dowel, slightly offset from the centre. A hole was then drilled to fit the small dowel in the side of each unit, measured as accurately as I could manage. I then attached the door, and closed it, and as expected, the closed position wasn't quite correct. Then came the clever bit - by rotating the larger dowel, with its smaller, offset dowel in the hole, the position of the larger dowel altered very slightly with respect to the front edge of the unit, thereby adjusting the closed position of the door. A bit of glue in the dowel hole and it set in position overnight.
I also bought some soft-close attachments, which I'm really pleased with. The doors can be swung shut against the soft-close mechanism, from where they slowly close themselves, ending with a quiet tap as the door touches the dowel stop. It's like clockwork, except it's pneumatic, or hydraulic, or something. Whatever.
In the picture below you can see the newly-fitted doors, handles, and the rear triangle of the desk top all fitted. Looks finished? Wait 'til you see the final step...

Tuesday, 15 July 2008
My Desk - the desk top
The desk top was going to be too large to cut from a single sheet, and even if it wasn't, a single sheet was too large to get home in the car. So I had the timber shop cut one sheet into two long thin rectangles, and planned to join them, together with a further small triangle for the back corner.
I was concerned that marking out the lines for cutting out such a large shape would be prone to cumulative errors - a slight error in a right-angle at a corner would magnify along the lines spanning from the corner. So I took measurements from multiple pairs of corners from the plan in Sketchup (the tape-measure tool makes this very easy), and used several measurements to "triangulate" the position of each corner point.
As with the rounded-rectangle holes in the backs of the units (see my previous post), I cut the desk top edges roughly with the jigsaw, but I waited to do the second pass with the router once I had the three pieces joined together, to make sure the straight edges were neat across the joints.
Holes for dowels to join the three pieces were drilled very quickly thanks to the dowel jig, but glueing and joining the pieces was unexpectedly difficult - I could not use my sash-clamps to compress the pieces together because a) they're too small, and b) there's no straight edge at the back corner of the desk top to clamp onto. By the time I had realised that the pieces weren't simply going to push together (8 dowels along the longer joint put up quite a resistance...) I already had the glue on and it was setting. I pushed and hammered jumped up and down on it (carefully - dowels snap easily if a joint is bent) and eventually gave up with a tiny gap along the joint.
The end result is that the desk top has wood filler along the joints, which is not great, but you can only see it if you look directly above the joint. I'm looking on it as part of the character of my home-made desk.
Once the glue had set, I took the desk top outside (too big to fit in the garage!) and used the router to cut the final clean edge to each side.
Now it's starting to look like a desk!

In this picture you can also see that I've attached the drawer sliders and put the drawer in the left-hand unit.
I actually sat at the desk in this state and did some work for a few days. That felt so good that it spurred me on to finish it properly.
I was concerned that marking out the lines for cutting out such a large shape would be prone to cumulative errors - a slight error in a right-angle at a corner would magnify along the lines spanning from the corner. So I took measurements from multiple pairs of corners from the plan in Sketchup (the tape-measure tool makes this very easy), and used several measurements to "triangulate" the position of each corner point.
As with the rounded-rectangle holes in the backs of the units (see my previous post), I cut the desk top edges roughly with the jigsaw, but I waited to do the second pass with the router once I had the three pieces joined together, to make sure the straight edges were neat across the joints.
Holes for dowels to join the three pieces were drilled very quickly thanks to the dowel jig, but glueing and joining the pieces was unexpectedly difficult - I could not use my sash-clamps to compress the pieces together because a) they're too small, and b) there's no straight edge at the back corner of the desk top to clamp onto. By the time I had realised that the pieces weren't simply going to push together (8 dowels along the longer joint put up quite a resistance...) I already had the glue on and it was setting. I pushed and hammered jumped up and down on it (carefully - dowels snap easily if a joint is bent) and eventually gave up with a tiny gap along the joint.
The end result is that the desk top has wood filler along the joints, which is not great, but you can only see it if you look directly above the joint. I'm looking on it as part of the character of my home-made desk.
Once the glue had set, I took the desk top outside (too big to fit in the garage!) and used the router to cut the final clean edge to each side.
Now it's starting to look like a desk!

In this picture you can also see that I've attached the drawer sliders and put the drawer in the left-hand unit.
I actually sat at the desk in this state and did some work for a few days. That felt so good that it spurred me on to finish it properly.
Sunday, 13 July 2008
My Desk - the desk units
One of the desk units will have the computer in it, and the other may contain other electrical equipment that may get warm, so some ventilation is needed front and back.
I don't want holes to spoil the front, so I've arranged the base to stop a couple of centimetres short of the door, leaving a gap that can't been seen from the front unless you get on the floor and peer under the door. Cunning, eh?
At the back, I decided to make one big rectangular hole with rounded corners, giving good ventilation and easy access for cables.
For the first unit I used a wood drill to cut the rounded corners. This made the MDF rather too hot (not a nice smell), and the results weren't particularly neat, but after applying a bit of wood filler in a few places, then sticking on veneer edging, it wasn't too bad. And it's at the back so no-one is going to be inspecting it too closely.
For the second one, I used a forstner bit in the router to do the rounded corners, which still made the MDF too hot, but gave a neater result.
I cut the straight edges roughly with a jigsaw, then neatly with mutiple passes with the router. This took a long time to do as each line required a straight edge to be clamped in place first, and I couldn't think of a way of doing this accurately other than trying it with the straight edge clamped too far away, then measuring the error and adjusting the clamped straight edge. Tedious, but it worked.
Dowels were used again to fix the parts together. The base is raised up by 40mm as it has a small "kick-board" at the front edge, so it was not possible to use the dowel jig for the holes for this. So instead I measured carefully, then drilled as straight as I could without the jig, and it all fitted together just fine:

I don't want holes to spoil the front, so I've arranged the base to stop a couple of centimetres short of the door, leaving a gap that can't been seen from the front unless you get on the floor and peer under the door. Cunning, eh?
At the back, I decided to make one big rectangular hole with rounded corners, giving good ventilation and easy access for cables.
For the first unit I used a wood drill to cut the rounded corners. This made the MDF rather too hot (not a nice smell), and the results weren't particularly neat, but after applying a bit of wood filler in a few places, then sticking on veneer edging, it wasn't too bad. And it's at the back so no-one is going to be inspecting it too closely.
For the second one, I used a forstner bit in the router to do the rounded corners, which still made the MDF too hot, but gave a neater result.
I cut the straight edges roughly with a jigsaw, then neatly with mutiple passes with the router. This took a long time to do as each line required a straight edge to be clamped in place first, and I couldn't think of a way of doing this accurately other than trying it with the straight edge clamped too far away, then measuring the error and adjusting the clamped straight edge. Tedious, but it worked.
Dowels were used again to fix the parts together. The base is raised up by 40mm as it has a small "kick-board" at the front edge, so it was not possible to use the dowel jig for the holes for this. So instead I measured carefully, then drilled as straight as I could without the jig, and it all fitted together just fine:

Friday, 16 May 2008
My Desk - checking and grouping the rectangles
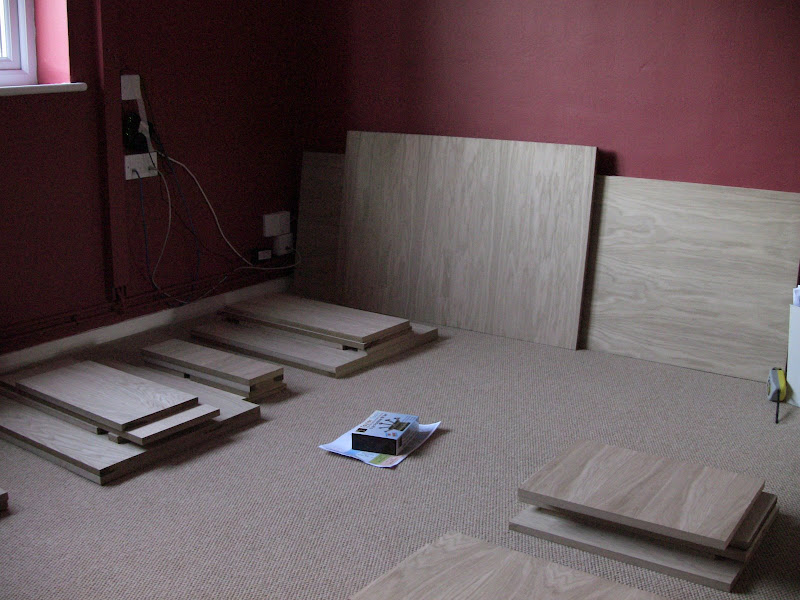
Having transported all the wood home, I double-checked all the dimensions, and grouped all the rectangles into little piles that go together - one for a drawer, one for the left unit, etc:
The dark areas on the back edges you can just make out in the picture are what happens if wood glue touches the veneer - it stains it.
I decided to start with a small drawer. I'd purchased some cam and bolt fixings for connecting edges together, but it quickly became apparent that this was not a good choice. I made two holes for two cams on the back piece of the drawer using a forstner bit of the required size, and holes for the matching bolts with a wood drill. The holes for the bolts probably need more precisely-sized holes than I could drill with my integer-only millimetre drills, as the bolt didn't screw in easily, and that caused the veneer to raise up into a mound around the bolt. It was also a lot of fuss to get the cam hole in the right position and to the right depth. Everything was going to take far too long at this rate.
So I made a Plan B, and went out and bought a dowel jig and some dowels. Holes for dowels were a lot quicker to make accurately using this, and I quickly had all the pieces of the drawer held together. A bit of gluing and clamping in the jaws of my workbench over a couple of nights and the drawer carcass was done.
Next came the glue-on veneer edges. This task is very satisfying - it's really easy to iron the strips on, trim off the excess with a plane, then sand the edges smooth, and get a really good finish.
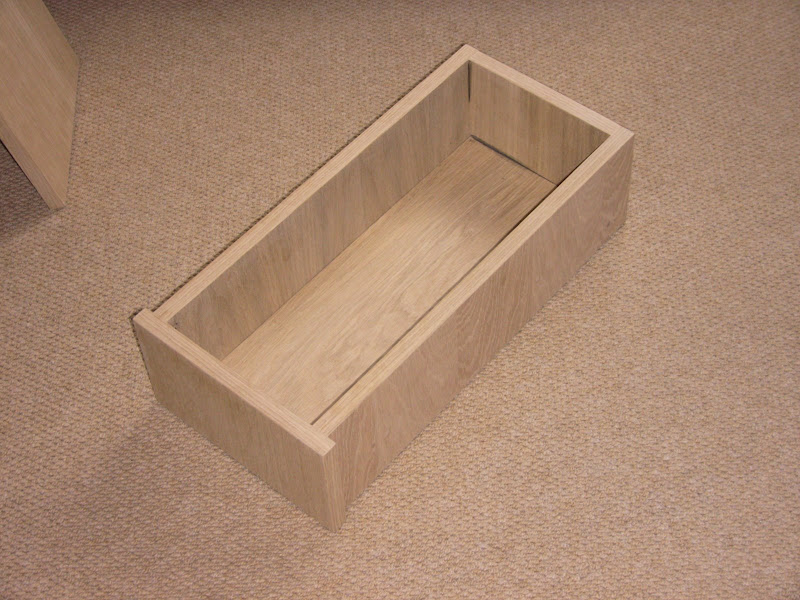
Here's a photo of the end result:
So I made a Plan B, and went out and bought a dowel jig and some dowels. Holes for dowels were a lot quicker to make accurately using this, and I quickly had all the pieces of the drawer held together. A bit of gluing and clamping in the jaws of my workbench over a couple of nights and the drawer carcass was done.
Next came the glue-on veneer edges. This task is very satisfying - it's really easy to iron the strips on, trim off the excess with a plane, then sand the edges smooth, and get a really good finish.
Here's a photo of the end result:
The dark areas on the back edges you can just make out in the picture are what happens if wood glue touches the veneer - it stains it.
Saturday, 10 May 2008
My Desk - making it happen
Apart from the desk top, it's all rectangles. To look good, all those rectangles need to be cut accurately to size and squarely. I have a circular saw that cuts reasonably straight, but the propect of carefully marking up and cutting all 36 rectangles from large sheets was enough to put me off ever starting the project. Plus the circular saw doesn't cut a very neat edge. This is where the cunning plan comes in...
Ridgeons, where I was planning to get the wood, has a large wall-mounted saw which they can use to quickly and accurately cut sheets of wood. I reasoned that if I made a cutting plan for the required number sheets, I could pay Ridgeons to do this bit for me, and then all (all! hah!) I'd have to do would be to fix the rectangles together to make a desk.
I like oak, but solid oak is expensive and would probably split or warp if I tried to make a desk out of rectangular panels of it, so I opted for oak-veneered MDF, as used in the construction of the Billy bookcases. Ridgeons sell it in sheets of 2440mm by 1220mm, so I set about arranging the required rectangles onto sheets, trying to minimise wastage and number of cuts.
At first I tried to use Sketchup to rotate all the rectangles into the same plane and fit them to sheets, but that turned out to be quite tedious, so instead I manually copied the size of each rectangle into a spreadsheet (hiding each in Sketchup as I copied it to avoid missing or duplicating any), then used OpenOffice Draw to create a 2D drawing of all the rectangles (labelled and colour-coded for easier checking), and arrange them onto sheets. Here's one of them:

The chap in the timber cutting section at Ridgeons told me to allow 4mm for the cuts, and explained that it's difficult to make cuts that stop part-way across a sheet. The small white circles on the sheet above are numbers, indicating an order for the cuts that ensures each is a cut right across a sheet.
The shape of the desk top I would need to cut myself, but I thought I could manage that as it would only be a small number of cuts. The top would be too large to cut from a single sheet, and also too large to fit in my car, so I split it into three parts, and added rectangles of the required size to the cutting plans.
I chose sheets with crown-cut veneer, which has nice patterns in it, on one side, and cross cut, which has a plainer pattern, on the other, planning to use the crown-cut as the more visible sides of the desk.
I took printouts of the cutting sheets (four in total) to Ridgeons, and they quoted me a discounted price of £15 for the cutting, and about £250 for the wood. £15! A bargain! Think how long it would have taken me to cut them myself!
I collected all the cut rectangles (and the off-cuts) a day later, and took them home in the back of the car (a hatch-back, with the back seat down). The spreadsheet of rectangle sizes was useful for checking everything was correct. In general, the accuracy was pretty good. I found two or three dimensions that were 1-2mm out, which was a little disappointing, but will probably be ok.
Another slight disappointment was that the sheets had been cut with the crown-cut side on the side of the saw that produces more splinters, and for the cuts that went across the grain this meant the edges were quite ragged. As a result I decided to use the plainer cross-cut sides for the more visible sides of the desk, hiding the more ragged edges.
The final disappointment was my fault. I put the rectangle for the filing-cabinet top onto the cutting sheet the wrong way round, so the grain goes the wrong way when compared to the desk top. If this looks too bad then I could get another one cut (perhaps with some more rectangles for future projects...), but I might just leave it as one of the "features" of a piece of home-made furniture (and it won't be the only "feature"...).
Next-up: fixing the rectangles together...
Ridgeons, where I was planning to get the wood, has a large wall-mounted saw which they can use to quickly and accurately cut sheets of wood. I reasoned that if I made a cutting plan for the required number sheets, I could pay Ridgeons to do this bit for me, and then all (all! hah!) I'd have to do would be to fix the rectangles together to make a desk.
I like oak, but solid oak is expensive and would probably split or warp if I tried to make a desk out of rectangular panels of it, so I opted for oak-veneered MDF, as used in the construction of the Billy bookcases. Ridgeons sell it in sheets of 2440mm by 1220mm, so I set about arranging the required rectangles onto sheets, trying to minimise wastage and number of cuts.
At first I tried to use Sketchup to rotate all the rectangles into the same plane and fit them to sheets, but that turned out to be quite tedious, so instead I manually copied the size of each rectangle into a spreadsheet (hiding each in Sketchup as I copied it to avoid missing or duplicating any), then used OpenOffice Draw to create a 2D drawing of all the rectangles (labelled and colour-coded for easier checking), and arrange them onto sheets. Here's one of them:

The chap in the timber cutting section at Ridgeons told me to allow 4mm for the cuts, and explained that it's difficult to make cuts that stop part-way across a sheet. The small white circles on the sheet above are numbers, indicating an order for the cuts that ensures each is a cut right across a sheet.
The shape of the desk top I would need to cut myself, but I thought I could manage that as it would only be a small number of cuts. The top would be too large to cut from a single sheet, and also too large to fit in my car, so I split it into three parts, and added rectangles of the required size to the cutting plans.
I chose sheets with crown-cut veneer, which has nice patterns in it, on one side, and cross cut, which has a plainer pattern, on the other, planning to use the crown-cut as the more visible sides of the desk.
I took printouts of the cutting sheets (four in total) to Ridgeons, and they quoted me a discounted price of £15 for the cutting, and about £250 for the wood. £15! A bargain! Think how long it would have taken me to cut them myself!
I collected all the cut rectangles (and the off-cuts) a day later, and took them home in the back of the car (a hatch-back, with the back seat down). The spreadsheet of rectangle sizes was useful for checking everything was correct. In general, the accuracy was pretty good. I found two or three dimensions that were 1-2mm out, which was a little disappointing, but will probably be ok.
Another slight disappointment was that the sheets had been cut with the crown-cut side on the side of the saw that produces more splinters, and for the cuts that went across the grain this meant the edges were quite ragged. As a result I decided to use the plainer cross-cut sides for the more visible sides of the desk, hiding the more ragged edges.
The final disappointment was my fault. I put the rectangle for the filing-cabinet top onto the cutting sheet the wrong way round, so the grain goes the wrong way when compared to the desk top. If this looks too bad then I could get another one cut (perhaps with some more rectangles for future projects...), but I might just leave it as one of the "features" of a piece of home-made furniture (and it won't be the only "feature"...).
Next-up: fixing the rectangles together...
Subscribe to:
Posts (Atom)
